Design Your Own: Rapid Design
Guiding Questions:
- How can we elicit evidence?
- How can we collect evidence?
Activity Duration: 1-1.5 hours
All of the data collection tools in the Beyond Rubrics Toolkit are designed using the principles discussed in the Introduction. Here is a refresher:
- Assessment of making should be construct driven. The skills, mindsets, and dispositions need to be clearly articulated, discussed, and negotiated by members of the learning community to be assessed. Some of the tools are more appropriate for certain types of constructs. Some are designed to capture evidence around very particular constructs, such as Stuck Station which is designed to capture evidence of Troubleshooting.
- Assessment in making should be seamlessly woven into the culture of the classroom and learning environments. The assessment should be ongoing, engaging, and continuous, and the line between learning and assessment blurred. Many of the tools will take practice to use, and will take time to become truly part of a classroom’s culture and routines.
- Assessment in making should be evidence-centered. The tools are designed to generate visible, tangible, and varied forms of evidence that can be linked back to the underlying constructs.
- Assessment in making should involve students as active participants. When using the data collection tools, students will receive evidence that was noticed by others and also act as data collectors, noticing things about their own practice as well as that of their peers.
In this activity you will have the opportunity to try out the Beyond Rubrics design principles to rapidly design a maker activity and data collection instrument with colleagues. The designs will be based on a set of Rapid Design cards which will include a Construct, Context, and Secret Ingredient. These prompts will help to get you out of the specific context of your classroom and focus on designing with the principles in mind. Feel free to swap out the Constructs to one you focus on in your class.
Before you begin
- Collect the following materials:
- Writing & drawing tools
- Flipchart paper or white board
- Rapid Design cards, printed double-sided, cut, and sorted into decks
- Assign Roles:
- Facilitator: will guide participants through the steps in the process.
- Time-keeper: will keep track of time for each step in the process.
Facilitation Guide
Warm-up (10 min)
- Go around the circle and share: What is one learning experience from your childhood, in or out of school, that you remember fondly? What was it about the experience that made it stick with you?
Rapid Design (50 min)
- Draw one card from each of the three decks: Construct, Context, and Secret Ingredient.
- Design (30 min). Work together to create a prototype of a maker activity and data collection tool. Document your design onto a poster that includes:
- Your definition of the construct or skill. How did you define the construct?
- The maker activity or task. What are you asking the students to do to demonstrate the construct?
- Examples of good evidence of learning. What will you see that shows you the students are demonstrating the construct or school?
- A tool or mechanism for collecting evidence. How will you collect visible, tangible evidence?
- Gallery Walk (10 min): If multiple teams were designing at the same time, take a few minutes to look at all of the prototypes that were designed. What do you notice? What do you wonder?
- Debrief as a group with the following questions:
- What in the designs stands out to you?
- What was easy about this design process? What was hard?
- What were characteristics of the activity you designed that allowed for students to demonstrate evidence of your selected construct?
- How did you decide what good evidence of learning for your construct looked like? What is good evidence?
- What are changes you could make to the activities you facilitate to allow students to show evidence of learning? How will you capture that evidence?
The card mechanic was inspired by the co-design practices of the IDeATe Network at Carnegie Mellon University.
Next Steps
- Pick one of the activities or lessons you are planning to facilitate in the next month. What is one tool you could remix or modify from the Beyond Rubrics Toolkit or your designs today that you could implement in your makerspace or classroom?
Tool Remix and Modification Examples
Explore the Teacher Guides for each tool included in the toolkit for suggested remixes or modifications that have been tried in other classrooms. The modifications vary from minor modifications to full redesign of tools:
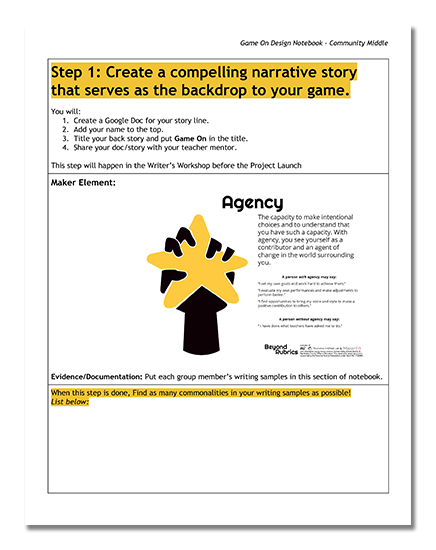
Incorporate into an existing protocol. Include definitions of constructs and and documentation tools into a “Lab Notebook” or “Design Journal” you already use to support project based work. In the example below, the teacher incorporated the definition of the Maker Element into a design notebook, and asked students to capture notes and evidence right on the page.
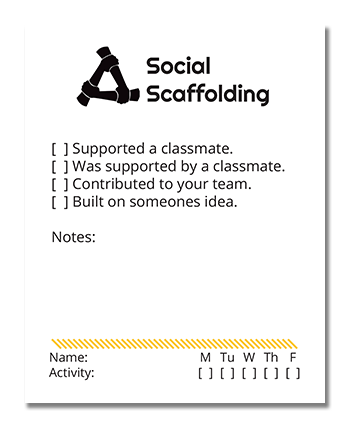
Small remix. Add sentence stems to Sparkle Sleuth slips based on your classroom’s understanding of a competency. This made it easier to identify moments, and allowed teachers & students to more quickly fill out the slips.
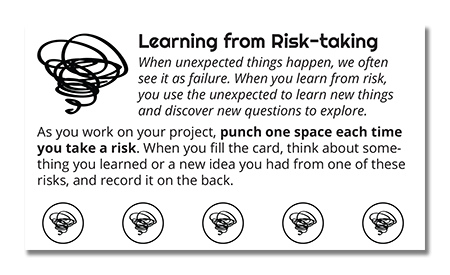
Tool redesign. Maker Moments allows participants to quickly document an instance of a construct, but doesn’t collect any qualitative information. This “Maker Punch Card” takes the quantitative mechanic from Maker Moments but asks students to record qualitative reflection on the back after the card is full.
If you try something that works well in your learning community, share it with us!